
I built a modular synthesizer without any electronics experience, and I want to empower others to do the same, to build their own weird sound machines. I want people to know that this is not beyond the realm of possibility- you can do it, and for cheap!
A few years ago I started trying to build an analog modular synthesizer from scratch. I managed to learn enough to make some modules, and my synth is always growing! You can read more about it here: https://chrisbeckstrom.com/the-modular
I wrote this short guide to help get folks started. I’m planning on writing more.
Surely there are a lot of different ways to get started in synth DIY (making a synthesizer yourself). This is just what I’d recommend to somebody just starting out. Everybody is unique and your mileage may vary. Hopefully this can serve as a jumping off point on your journey to building weird electronic instruments and making even weirder sounds.
Important
Aside from the things listed below, the most important things you’ll need to get started in synth DIY are
- A desire to make things that make sound
- Plenty of patience
- A willingness to fail
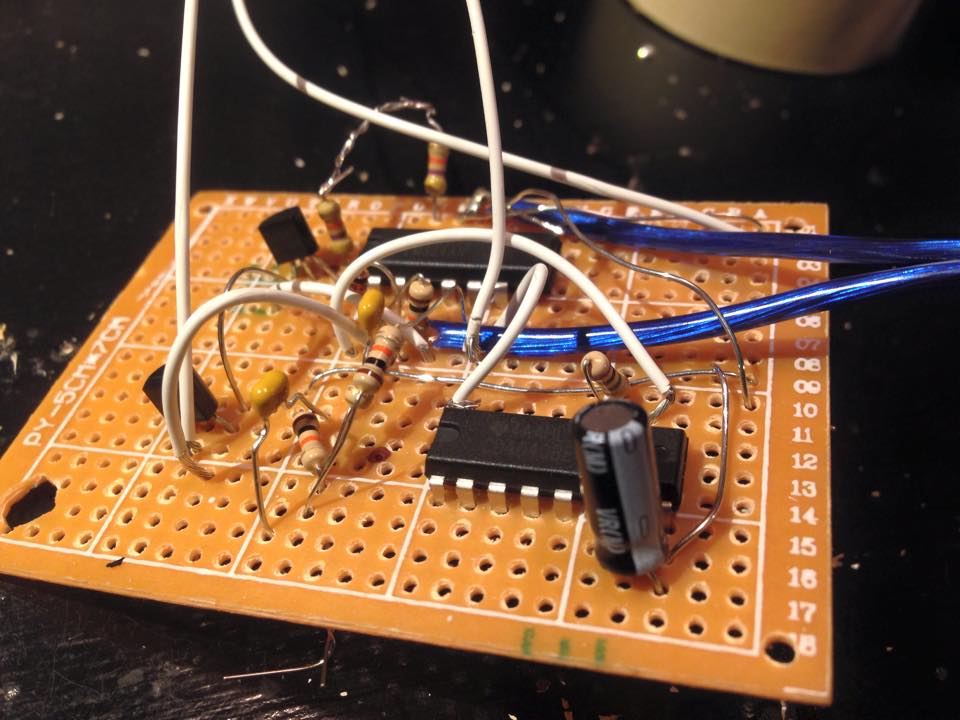
It took me more than twenty attempts over the course of a few days to breadboard my first working circuit, but eventually I figured it out. When I finally heard that harsh droning of that square wave, it was the sweetest sound. Each time you fail, you get a little better. Hang in there, you can do it!
Also, if you get discouraged: take a break. Remember to breathe.
Gear
You’ll need a few things to get started. Here is the minimum I’d recommend:
- A breadboard
- Soldering iron (make sure it says “for electronics,” not for plumbing)
- Solder (avoid “lead core” for health reasons, and also make sure this is for electronics). In my experience, the thinner the diameter the better
- Passive components – resistors, capacitors, diodes, potentiometers, etc.
- Some active components like transistors, and definitely some ICs (integrated circuits)
- Some LEDs because blinky lights are always fun, and are especially helpful when you’re starting out (always put a resistor before or after an LED! If you don’t, they are likely to quickly burn out!)
- alligator clips for connecting things together
- A power source – a 9V battery works great
- Some sort of amplifier/speaker combo like portable computer speakers, a stereo with an “aux input,” etc.
Some things that will make life easier:
- One of those “helping hand” tools that has alligator clips to hold things in place while you solder
- A soldering iron stand – anything that can safely hold your hot soldering iron and keep it from falling or burning anything. Sure, you can just put your soldering iron on a desk, but if it rolls off…
- Speaking of desks, you’ll probably want a place to work. Choose a place with ventilation (soldering fumes!) and one that is away from little ones who might try to eat a capacitor
- A small bright light to help you see what you’re doing
- a 3.5mm audio jack for easily connecting your creations to an amp/speaker
Learning
For pretty much everything here, I highly recommend getting Forrest Mims’ book “Getting Started in Electronics.” You can get it for about $20 on Amazon, and probably cheaper or even free from other places (like your local library).
There are a few skills you’ll need to acquire before you can build your monster synthesizer.
First, learn about the basic passive components and a very general idea of what they do. A full understanding of the physics involved is definitely not necessary. Even if you just learn their names and schematic symbols, that should be enough for now!
Then learn how to read a schematic. A schematic is basically a map of where the electricity flows, and isn’t that different from reading a subway or railroad map. If you can read a schematic, technically, you can build anything for which you have a one. Of course reading a schematic and figuring out how to place the components and soldering them successfully is another matter…
Using a breadboard takes some practice, but don’t worry: you’ll get the hang of it.
Next steps
What to build? Assuming you’ve put together a modest assortment of tools and components, you’re ready to rock!
There are a million cool circuits out there on the internet, and you’ll be ready to tackle all of them in no time. For starters, though, I’d recommend something simple like a 40106 IC square wave oscillator.
The Logic Noise series on Hackaday is fantastic, and has a great writeup about using this IC. https://hackaday.com/2015/02/04/logic-noise-sweet-sweet-oscillator-sounds/
There’s a lot of technical information in that article, but don’t let it scare you. To make a square wave oscillator, you’ll just need:
- 1 100k potentiometer
- 1 0.1uf capacitor
- 1 40106 integrated circuit
- 1 9V battery
- Some kind of speaker
If you plug them up the right way, you’ll get a sound.
Specific components
Here are some of my favorite components that I use all the time:
- 1k, 100k, and 1M resistors (1/8 watt)
- 0.01uF, 0.1uF, 2.2uF, 10uF, 100uF capacitors
- Logic ICs (integrated circuits) 40106, 4046, 4069, 4017, 4040, 4015
- Potentiometers (I use almost exclusively 100k and 1M linear potentiometers)
- 1N4148 diodes
- BC547 transistors
The good news is passive components like resistors and capacitors are very cheap, sometimes one or two cents each. It’s always good to have plenty of those, so stock up if and when you can.
Where to buy these things? I like https://www.taydaelectronics.com – they have plenty of good stuff for making synths, but not so many choices it’s overwhelming. They have reasonable shipping costs too.
Be careful purchasing components
- Be sure to buy 1/8 watt resistors, otherwise you might end up resistors the size of pencils like I did once!
- Also make sure that nothing you buy says “SMD” or “surface mount” or anything like that. There are two main type of components: surface mount (super super tiny!) and “through hole” (manageable!). Starting out, you definitely want “through hole.”