I built a modular synthesizer from scratch!
Click here to see every post about synth stuff
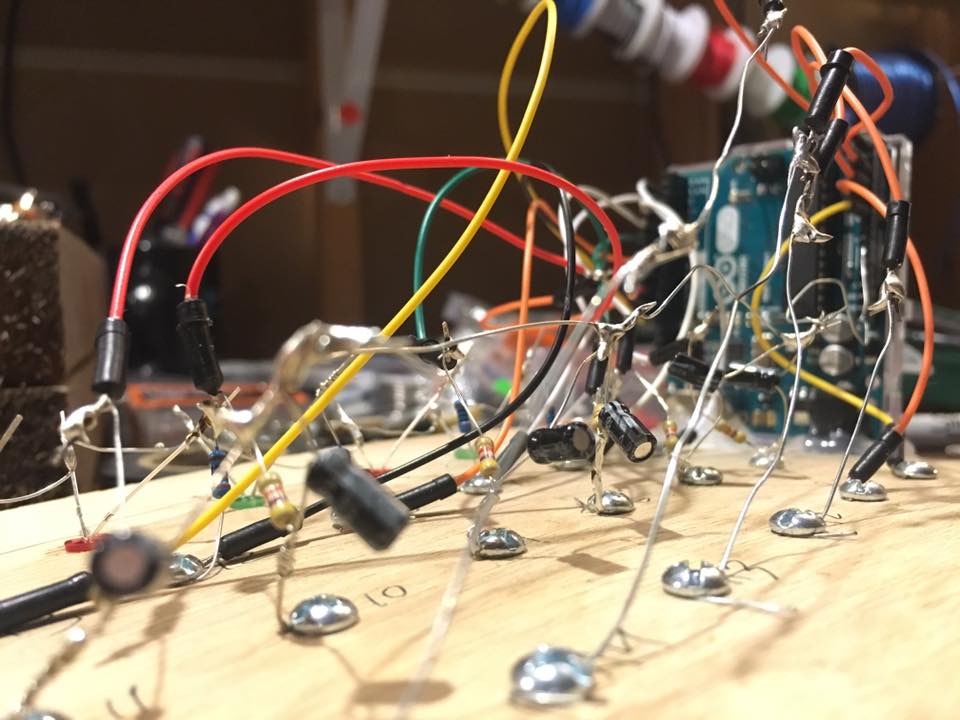
For a long time I’d pined for a fancy modular synthesizer, but looking at the steep prices I knew I’d never be able to afford a system large enough to satisfy my aural explorations. In the Spring of 2015 I bought a soldering iron, ordered some components, and started playing with electronics. I wanted to see if I could build a synthesizer, one piece at a time, without any electronics background, math skills, or experience.
I could! One of the many revelations I’ve had throughout this process is that with a little enthusiasm, some persistence, and a lot of free time, anybody can build synthesizers. They may not be perfect, pristine, or commercial-grade, but they make noise.

…And you can too!
I want to encourage more folks to try building sound-making devices. I want to remove barriers preventing those who are interested in modular synthesis from experimenting with it.
I think we need more diversity in the electronic music community, especially when it comes to modular synthesis. We need more people who aren’t upper middle-class white dudes wiggling knobs, and perhaps one way to accomplish that is to get folks building their own inexpensive music-makers.
A synthesizer doesn’t have to be expensive, and you don’t need to be an electrical engineer to build one.
I post many of my circuits on GitHub.
I’m considering writing some tutorials or perhaps even a book about my process; the lofi, lowest-cost-possibleynthesizer building method. More info coming soon…?
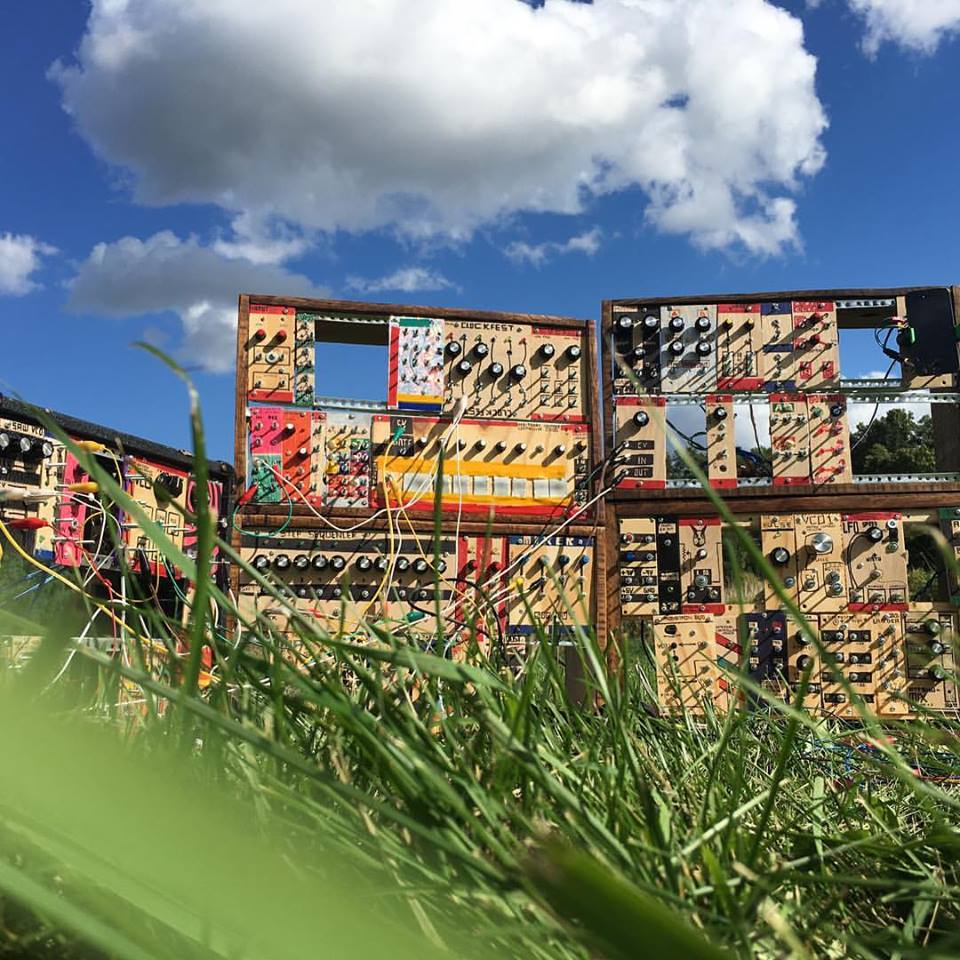
Here’s what it looks like
I know it can be tough to see what’s happening in videos. I’m constantly moving modules around, building new ones, and fixing broken ones, which means the modular is always changing. Here’s what it looked like as of January 2017:


My synth “format” and construction
Originally I intended to follow the Eurorack format (which I think is ±12V with +5V for digital modules) but I’m not skilled enough (nor did I have the right wall warts) for that. Instead, my synth uses ±9V (from a +20V wall wart) and +5V (from a +6V wall wart). The size is mostly Eurorack (3U tall) and I’ve built my cases standard rack size widths (19″).
My panels are constructed out of 1/8″ plywood, mostly oak, and decorated with sharpie markers. For connectors I use #6 nuts and bolts and connect them with alligator clip patch cables I make using clips and boat trailer wire I get at the grocery store (comes in cool colors). I got this idea from this amazing creation by PHOBoS on the electro-music.com forums.
My general focus has been on building basic modules that can be patched to make cool sounds. I also use a lot of LEDs because blinkenlights are awesome.
I currently (January 2017) have about 50 modules that include around 15 oscillators (mostly square waves) and lots of ways to manipulate them (filters, logic modules, shift register, sequencer, comparator, dividers, envelopes, LFOs, amps, etc). I also have a sort of “skiff” that includes a very primitive keyboard and a breadboard mounted into a panel for easy circuit building. My synth is built into 4 19″ x 6U cases (24U of modules) constructed out of wood from reclaimed pallets.
In addition to the DIY modules, there is also a broken-down Korg Monotron Duo I use primarily for the excellent low pass filter.
About the circuits
I understand very little about how these circuits actually work– 99% of the circuits come from the internet, especially the following places:
– electro-music.com DIY forum
– electro-music.com Lunetta forum
– Nicholas Collins’ “Handmade Electronic Music” (2006)
– Fun with Seamoss website (no longer up)
– Hackaday Logic Noise series
– Ken Stone’s Modular Synth site
– Yu Synth DIY
Thanks to all those folks for sharing their designs! Please don’t look at my circuits, go see the originals. Those folks know what they are doing. My circuits are only here for reference, just to show you can build a great-sounding synthesizer with extremely primitive circuits.
Building the circuits
If you’re feeling adventurous, don’t just build these circuits– breadboard them first! I made many small modifications that may not be reflected in the schematics; also, I barely understand anything about electricity so take everything with a grain of salt. If you know your way around electrical engineering you will probably see about a million things I’ve done incorrectly. That said, my synthesizer works and sounds awesome, and I haven’t blown anything up (except for a handful of ICs, resistors, LEDs, pots, transistors, and other components).
More info
Circuits, code, panel design, PureData patches, Arduino sketches, etc: https://github.com/chrisbeckstrom/diy_modular_synthesizer/
LIST OF MODULES
updated December, 2017
Note: most of these modules have many uses (i.e. a resonant filter can also be used as an oscillator or a VCA) so to some extent these groupings are arbitrary; after all, it’s all just voltage!
OSCILLATORS/GENERATORS
AUDIO RATE
VCO (saw, square, triangle, short pulse)
VCO (saw, pulse)
Triple saw VCO
Arduino wavetable synth voice with MIDI input
VCO (square, half saw)
VCO (square, saw-ish, 4046/PLL-based)
square wave to 8-bit stepped saw wave converter
twin T drum/bandpass filter/oscillator
LFOs
square LFO (“pulse”)
LFO x5 (square LFOs)
“Clockfest” square wave/clock x5
LFO (triangle, very slow to audio rates)
fidget spinner / guitar pickup dual voltage source
OTHER
CMOS noise
White noise (HP, LP, regular)
VCAs
VCA (op amp + transistor, diode)
VCA (transistor)
low pass gate VCA/filter (x2)
dual VCA (vactrols)
VCA (vactrol)
VCA (4066 analog switch-based power-starve hack VCA)
SEQUENCING
10 step sequencer (CV and gate)
10 step sequencer (microcontroller-controlled/Arduino, CV, gate, CV step address)
4-stage shift register
8-stage shift register
4-stage sequential switch
8 to 1 / 1 to 8 multiplexer/demultiplexer (4051-based, way more than sequencing)
ENVELOPES
slope generator (rise/fall)
CONTROLLERS
shotgun shell photoresistor (i.e. light theremin)
ribbon controller
OTHER
sample and hold
“space noise” (psuedo-random signal source)
gate to trigger converter active (x3)
gate to trigger converter, passive (x4)
contact mic + springs (tap it to generate voltages, use as manual trigger, sound source, etc.)
HARMONICS/WAVESHAPING
voltage controlled low pass resonant filter
voltage controlled low pass + high pass filters (can combine for band pass)
twin T drum/bandpass filter/oscillator
voltage controlled diode clipper (positive and negative)
dual comparator
square wave to stepped saw wave converter/generator
voltage controlled diode clipper (distortion)
EXTERNAL INPUT/DISTORTION
Preamp (LM741)
preamp x4 (set gain x5)
preamp/distortion (with lots of gain)
stereo preamp (for iphone, etc)
iPhone holder + power with audio outputs [broken]
Envelope follower
MIXING
4 input inverting mixer
4 input inverting mixer
3 input non-inverting mixer
3 input 3 output passive matrix mixer
diode mixer / pseudo-ring modulator
passive attenuator x3
passive attenuator / i/o (headphones)
single attenuator
sequential switch
various attenuators (passive)
EFFECTS
delay (pt2399)
spring reverb (it’s in its own case)
DIY plate reverb (not really a part of the modular exactly, but it is in spirit)
LOGIC / UTILITY
quad AND gate
quad XOR gate
logic inverter x3
logic inverter x2 (part of stepped saw module)
r/2r ladder (digital to analog converter, DAC)
dual control voltage processor
simple slew (capacitors)
gate to trigger converter (x1 active, x2 passive)
clock divider (powers of 2) (x2)
clock divider (/2 /3 /4 /5 /6 /7 /8 /9 /10 /16)
dual comparator
“Mission control”: an arduino with every pin brought to the panel. Currently it’s being used as a serial MIDI to control voltage/gate/trigger converter. (In other words, I can play MIDI on my computer and make the modular do stuff)
MISC
jack converter (banana, 3.5mm, bolt, 1/4″)
jack converter (bolt, 3.5mm, 1/4″)
misc (button, switch, power connections)
oscilloscope connections
power supply (+-9V)
monotron duo
external controller power (for skiff)
power (+5V)
3.5mm jack to bolt converter